four corners

Name:
Location: Dallas, Texas, United States

I love complicated stories about people and places. Stories that show connections and threads in a chaotic world.

Tuesday, June 13, 2006

Student Book Competition

AID students, this may be of interest for those who like to create artist books. Check out the Nebraska Book Arts Center website.

For full details and an entry form, go to www.nebraskabookartscenter.org.

Heart and Hands 2, a second national juried student book art exibition, will showcase the best examples of the broad range of books being made by graduate and undergraduate students in accredited academic institutions.

Books, not slides, will be juried by book artist Timothy Ely, whose books have been exhibited and are part of museum and library collections all over the world.

Entries must be received between October 2 and October 13, 2006.
Notification of Acceptance and return of books not selected by December 1,2006
Return of books not purchased by March 1, 2007.
$1200+ in Purchase Awards (Accepted entries must be available for sale.)

Books completed between June 1, 2004 and October 1, 2006 are eligible.

Exhibit dates:
November & December 2006 at UNL Love Library, Lincoln, Nebraska
January 2007 Omaha Public Library
February 2007 UNO Library, Omaha, Nebraska

Saturday, June 10, 2006

The Nested Accordion Pop-up Fold Book

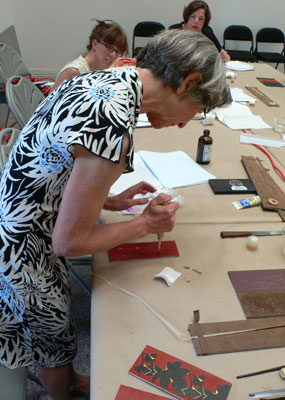
On the last posting, you found out a bit about Donna and Peter. I hope you had a chance to visit their web site and see their work. This posting is about Peter Thomas' book arts workshop conducted at the Degolyer Conference.

By the end of the workshop we had created a new book structure Peter calls the Nested Accordion Pop-up Fold Book. This structure combines a basic Accordion book structure with a pop-up structure.

This combination of book techniques, as well as other creative book structures they have developed, are in their new book - More Making Books By Hand. The drawings and step-by-step instructions are very easy to follow.
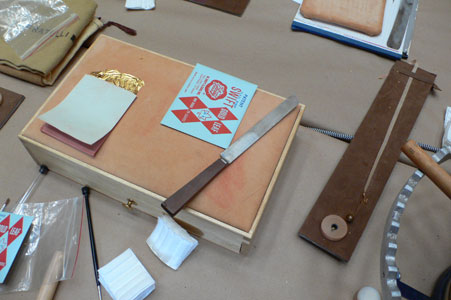
To make the Nested Accordion Pop-up Fold Book you will need:
  • One outer accordion that is 2.75"x14"
  • One inner accordion that is 2"x14"
  • Two davy boards - 2 7/8"x 1 7/8"
  • Cover paper for each of the davey boards - 3 7/8"x 2 7/8"
  • PVA glue
  • Flat 1/4" bristle brush
  • Bonefolder

Accordion fold panels
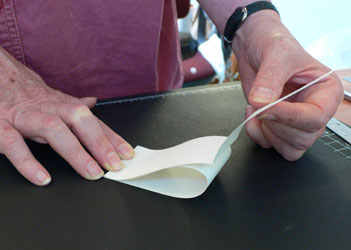
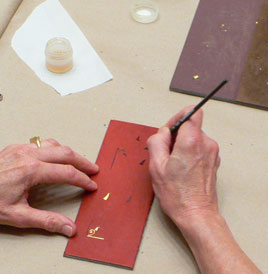
Step 1: Accordion panel construct
Cut the outer and inner accordion strips and fold them into shape. In this case the outer accordion is the gold color paper and the inner accordion to be nested is the cream color paper. Look at yesterday's posting to view the easy way of getting a perfect accordion fold. I like using contrasting paper for it's visual appeal. Notice how the accordion structure has high folds and low folds? The low fold is called a valley while the high fold is called the peak.Pull the end panels back

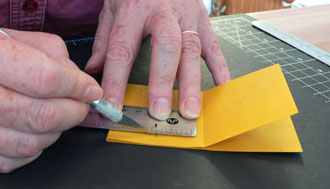
Step 2: The measuring and cutting
Only three interior panels should be cut. The front and back panels should be uncut. The accordion book is in a folded position except for the edge panels. Be sure they are out of the way before you start any measuring or cutting.
Measuring the popups
First measure down 5/16" from the top edge of the folded book. Second measure up 5/16" from the bottom edge of the folded book. Third measure in 1 7/8" from the foredge of the folded book. This should be half measure of the folded panel. If you need to draw a line to get the cuts straight, use a pencil so that it can be erased when you are finished.Cutting popups

Now cut from the center point of the panel along the 5/16" mark at the top and the bottom. Cut through all the fold layers carefully. Keep the xacto knife perpendicular to the ruler as all times.Cutting other side

It isn't necessary to cut through all the layers the first time. It will take several passes to go through each panel. Don't lift the ruler until you are sure that all layers have been cut. Often you can tell by the sound and feel of the cuts. Also the edges will lift as they are cut free.Flaps are loose

When you have finished cutting you should have what looks like loose flaps on either end of the folded book that go only halfway into the folded panel.

Folding popups
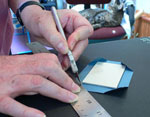
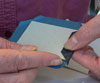
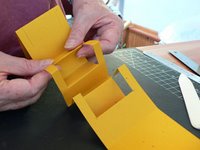
Step 3: Fold the pop-ups
When you have finished cutting, align you ruler on the vertical center of the folded panels. Use a bonefolder to score between the top and bottom cuts. Keeping the ruler in place, you can gently lift each panel at the foredge to deepen the crease that the score has made.Three folded popups

Open the folded paper strip. You should see three panels that have been cut at the top and bottom of the panels. The score will faintly show on each side of the slices.

Invert the fold of each of the three cuts. Carefully crease each the scored folds - there should be six of them. When you are finished there should be three panels that show a reversed pop-up structure. It sort of looks like a suspension bridge.

Step 4: Cut boards for hard covers
Daveyboard is typically used for hard covers. Always cut the board so that the direction of the grain is parallel to the back and foredge of the book. If you don't the boards will warp when the paper covering and endsheets are glued to them. This can create a poorly constructed book at least and can in some cases pull the book apart at worst. For this book, cut two hard covers that measure 2 7/8" x 1 7/8".cover paper cut

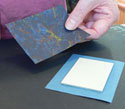
Step 5: Cut the paper covering
To cover the Daveyboard, cut your selected paper to extend at least 1/2" to 3/4" beyond the Daveyboard size on all sides. board width measureWhen covering the daveyboard, the bookbinder looks to eliminate the bulk of paper on the corners.folder first corner

That is why the corners are cut at a 45 degree angle tangent to each corner. Be sure to leave at least a board and half width at the very corner edge. This will give the proper coverage of the board without any gaps. I fold the paper over the corner of the board that is is squared. The creased folds will give a visual line to cut along. aoll corners foldedBe sure to cut out about 1/8" from the crease to allow for the corner tip coverage.cutting corner

Apply glue, in this case, to the daveyboard and lay it face down on the backside of the paper. Align inside the cut corners, giving space for the overlap of the corner tips. Press and hold until set. You can use a weight to keep the cover in place.

Once the glue has set, start with either the head (top) or the tail (bottom) of the board and use a small scissors or xacto knife to slit the corner. This will give you a sliver of paper to wrap around the corner when gluing. Apply glue to the paper at the top of the board and fold over the board edge. Tuck the cut sliver with the bonefolder over each side edge. Do the same procedure with the bottom side of the board.

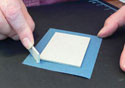
After the top and bottom is glued and tucked, move to the sides and glue them into place. Use the bonefolder to smooth the board edges and flatten the paper into the board. The front side of the board is the paper covered side. The back side of the board will have the edges covered with paper - the center is the gray daveyboard.

Lay the covers back side down on wax paper. Fold the wax paper over the top of the covers. Wax paper prevents any excess glue from sticking to any porous surface. Place light weights on both cover boards for about 20-30 minutes. The weighting process is to keep the book cover from bowing as the glue dries.

Typically, when one side of a board is glued it will bow in that direction. However, once you glue the end panels to the back of the board cover, the bowing will equalize because the glue is pulling on both sides as it dries.
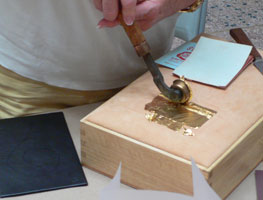
Step 6: Applying the endsheets
Once the cover paper on the boards are set (they don't have to be completely dry), it is time to glue the end panels of the outside accordion strip. Orient the gold accordion strip so the board cover will be attached to the "back side" of the accordion. The front side will hold the nested cream paper accordion strip. Glue the front end panel with the PVA glue and after a couple of seconds wait time, lay the end panel on the back side of the covered daveyboard. Be sure the corners are squared.

Now do the same to the back end panel. Use the bonefolder to flatten and smooth the end panel into place over the daveyboard covers. Place the light weights on the ends for a few minutes to set the glue.

Shortened inside accordion
Step 7: Shorten the inside panel
The inside accordion strip needs to be shortened to nest in the outside pop-up structure. Cut off two of the panel sections. this will leave an inside accordion strip with six panels.

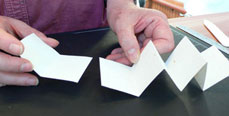
Step 8: Attach the inner accordion to the outer accordion
The inner accordion nests inside the outer accordion's pop ups. Match the valley of the inner accordion to the valleys of the outer accordion.

There are two ways to attach the inner accordion to the outer.
One is by gluing the valley sections to each other. I apply the glue to the outer accordion pop-up valleys and then lay the inner accordion on top. This allows for the mountian folds of the inner accordion to stand up and be free.

The other way is to sew the valley folds together using a thin strong linen or cotton thread. In a pinch, you can use a nylon sewing thread. The choice of attachments depends on the look and feel you want with the final book. This tutorial sample shows the glued version.
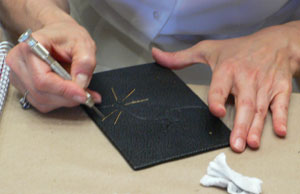
Step 9: Content
Of course each book begs for content. These miniature books are great for image collages, poems or quotes. Have some fun and check out Peter and Donna's other structures in the More Making Books by Hand.

Friday, June 09, 2006

The Perfect Accordion Fold According to Peter Thomas

Another workshop at the Degolyer Conference was with Peter Thomas. Peter and Donna Thomas have a great team thing going on. Donna is an illustrator while Peter is a binder and printer. I think they both are also papermakers. What a job! Check out their one of a kind miniature books. They are a very talented team.

If you have ever tried to fold an accordion book, you may have found that when you finished it looked more like a staircase than a folded book. Peter has a fail safe method for getting the folds stacked straight. He showed how to make perfect accordian folds that are SOOOO easy. The basic folding steps are simple.

Step 1:
This is for a miniature accordion book. Cut a narrow strip of paper about 2" by 14". Fold the strip in half.

Cutting the paper


Fold in half


Open fold


Step 2:
Take each edge of the paper and fold it to the center fold.

Fold 2


Fold 3


Step 3:
When you are finished, you will have three folds that shape the paper strip like a M. Invert the centerfold so the the paper strip look kind of like three wave crests.

Peaks and valleys


Step 4:
Take the first fold and fold it to the edge of the strip.

Fold 4


Step 5:
Take the center fold and fold it to meet the first fold's edge.

Fold 5


Step 6:
Take the third fold and fold it to meet the centerfold.

Fold 6


Step 7:
Take the final strip edge and fold it to meet the last fold edge. You should have an eight panel accordion.

Fold 7


Finished accordion

Tuesday, June 06, 2006

Gold Leaf Workshop with Jamie Kamph

Jamie Kamph workshopDuring the Degolyer conference Jamie Kamph led us in a demonstration in gold leafing leather surfaces. This workshop was great fun and I learned a great deal. She shared with us some of her tools and methods that made the process less time consuming and more efficient.


Tools needed:
  • Gold cushion
  • Brass gilding tools
  • Gold knife
  • Heating element for gilding tools
  • Fixor glaire
  • Cotton pads
  • Water
  • Fine point sable brushes
  • Gold leaf - 22 or 24 carat rolls or sheets
  • Board with half crocus cloth and half ultrasuede
  • Vaseline
  • Fine binding needles
  • Pen vise with blunt needle for cleaning off excess gold leaf

The basic steps are as follows:

  1. Draw out the cover design on grided vellum
  2. Do an initial blind tooling on the leather when it is dry through the vellum
  3. Wet the leather bookcase
  4. Blind tool freehanded over the previous tooling
  5. Apply the Fixor into the blind tooling
  6. Load a heated gilding tool with the gold leaf
  7. Apply the warm tool with the gold leaf to the leather
  8. Wipe loose gold leaf with cotton pad
  9. Clean excess leaf with blunt needle
Step1: Draw the Design
Grided vellum can be purchased at any art or architectural supply store. It is great to use when drawing out a design for a leather cover. If you get the larger size sheets, you can wrap the sheet around the leather bookcase to see how the design will fit on the whole leather case. Transfering the design pattern

Step 2: Transfer the design to the leather
The leather has been adheded to the appropriate thickness of davey board for the book case. Lay the vellum on dry leather. Use a warm brass tool to impress the design onto the leather. This will create faint marks to guide you when blind tooling later. It also gives you leaway to correct any tooling mistakes more easily.

Wetting the leatherStep 3: Wet the leather
Use the cotton pads dipped into water to moisten the leather surface. It does not need to be soaked just moist. The leather will look darker after it has been wetted depending on the finish of the leather. Vegetable tanned leathers, like the skins Harmatan produces, absorb the water more readily than chemical tanned leathers that use metallic bases.

Step 4: Blind tool the designJamie blind tooling
With the brass tools, carefully go over the original design marks. This is called Blind Tooling. Because the leather is wet the impression will become more pronounced. Blind tooling creates an embossed look in the reverse.

Jamie has a nice tip if the tooling is not to you liking. Use a very fine needle attached to a pen vise to slide into the tooled depression. It needs to go in further than just the tip but not the full length of the needle. Lift gently. The leather should float up as the moisture of the leather seeps into the depression.

Jamie applying the Fixor glaireStep 5: Apply the Fixor glaire
Fixor has the adhesive qualities to bind the gold leaf to the leather surface. Jamie recommeded Bookmakers as a supply source for Fixor. She also stressed to purchase the Fixor in glass bottles rather than plastic. Be sure to keep it out of the sun as it will go cloudy and the adhesive properties are lessened.

She dilutes the Fixor with water in 50-50 proportions. It should turn a cognac color. This mixture goes a long way in coverage. When kept out of the sun, it will last several weeks. If the mixture becomes cloudy, Jaime suggests using a drop of ammonia to clear it.

Select a fine point sable brush to apply the Fixor glaire into the blind tool impressions. Then let the glaire dry before application of the gold leaf.

Gold leaf cushion with heated gilding toolsStep 6: Loading the gold leaf
The heater keeps the brass tools warm but not hot. If the tool is too hot it will burn the leather as it makes the impression. I believe Jamie kept the temperature of the heater around 200 degrees.
Crocus and suede pad

Jamie has a nifty, easily made, tool to help with the gilding process. A little board about 8"x10" covered with half crocus cloth and half ultrasuede. Crocus cloth is a micro fine sandpaper. It is used to gently polish gold leaf off the brass tool without marring it.

With a bit of vaseline on the tip of your finger, lightly apply to the ultrasuede in a zig zag motion. The warm brass tool is passed across the sueded surface once or twice. This coats the tool surface with a sheen of oil that the gold leaf lightly adheres to. By lightly, but firmly, pressing the tool onto the gold leaf, it will stick to the tool. Loading a brass design tool

Jamie uses both the gold leaf sheets as well as the rolls. She prefers the rolls due to the fact there is less waste of leaf and a bit more manageable. Gold leaf is so light that the slightest puff of air will send it floating around the room. She has made another handy device, covered with suede, that holds the gold leaf rolls at the top. The roll tape with the gold leaf is lead down the board and tucked into an elastic band at the bottom. It makes it easy to load the tool with the gold leaf.
Loading a line rollerWhen you load the tool, more than likely, a bit of trailing leaf will fringe the tool. The fringe can be gently patted down on the tool with a cotton pad. Getting this "fringe" out of the way lets you see where you are applying the gold to the leather.

Step 7: Apply the gold to the designRolling on the gold
Using firm pressure apply the loaded tool to the blind tooled impression. Rock the tool slightly in all directions before coming center, holding momentarily and lifting. Or if you are using the line tool, roll slowly along the blind tooled line. You should see the gold being transferred to the design.

Ideally, the transferred gold leaf should have a crisp edge with a smooth, flat surface in the impression. Sometimes the gold will crack or lift. If it does this, reheat the tool, then reload the gold leaf and apply a second layer over the first one. If it still is rough, reapply a second coat of glaire before applying a third layer of gold leaf.

Step 8: Wipe the loose leaf
With a soft cotton pad, wipe off the loose gold leaf fragments from the tooled design.
Cleaning up excess gold leaf
Step 9: Clean off excess leaf
Jamie used a blunted darning needle locked in a pen vise to gently clean off the excess gold leaf that can stick to the edges of the blind tooled impression. The pen vise you can get at almost any good hardware store. I also have a favorite tool that I purchased from a local leather store. It looks like a stylus with a slightly rounded, bent tip. Either tool, used carefully, will not scar or scratch the leather as you clean the edges.